Deploy a YOLO model with BentoML#
YOLO (You Only Look Once) is a series of popular convolutional neural network (CNN) models used for object detection tasks. Several versions of YOLO have been developed since the original was introduced. This quickstart demonstrates how to deploy a YOLOv5 model by creating a BentoML Service with a custom Runner.
Prerequisites#
Make sure you have Python 3.8+ and
pipinstalled. See the Python downloads page to learn more.You have a basic understanding of key concepts in BentoML, such as Services and Bentos. We recommend you read Deploy a Transformer model with BentoML first.
(Optional) Install Docker if you want to build a Docker image by containerizing the Bento.
(Optional) We recommend you create a virtual environment for dependency isolation for this quickstart. For more information about virtual environments in Python, see Creation of virtual environments.
Install dependencies#
Create a requirements.txt file that contains the following packages:
Pillow>=7.1.2
PyYAML>=5.3.1
bentoml>=1.0.0
matplotlib>=3.2.2
numpy>=1.18.5
opencv-python>=4.1.1
pandas>=1.1.4
protobuf<=3.20.1 # https://github.com/ultralytics/yolov5/issues/8012
ipython
requests>=2.23.0
scipy>=1.4.1  # Google Colab version
seaborn>=0.11.0
tensorboard>=2.4.1
torch>=1.7.0,!=1.12.0  # https://github.com/ultralytics/yolov5/issues/8395
torchvision>=0.8.1,!=0.13.0 # https://github.com/ultralytics/yolov5/issues/8395
tqdm>=4.41.0
Install all the dependencies required for this quickstart.
pip install -r ./requirements.txt
Download the model#
Before you create a Service, you need to download a model, which can be saved in the BentoML local Model Store or elsewhere in your machine.
Create a download_model.py file as follows. In this script, the torch.hub.load() API loads the pre-trained model yolov5s from the
GitHub repository ultralytics/yolov5.
import torch

torch.hub.load("ultralytics/yolov5", "yolov5s")
Run the script and you should have a yolov5s.pt file in your current directory.
python download_model.py
Create a BentoML Service#
To create a Service based on the YOLO model, you need to create a custom BentoML Runner. Custom Runners are useful when the pre-built Runners do not meet your requirements, or you want to implement a Runner for a new ML framework.
Create a service.py file as follows.
import bentoml
from bentoml.io import Image
from bentoml.io import PandasDataFrame


class Yolov5Runnable(bentoml.Runnable):
    SUPPORTED_RESOURCES = ("nvidia.com/gpu", "cpu")
    SUPPORTS_CPU_MULTI_THREADING = True

    def __init__(self):
        import torch

        self.model = torch.hub.load("ultralytics/yolov5:v6.2", "yolov5s")

        if torch.cuda.is_available():
            self.model.cuda()
        else:
            self.model.cpu()

        # Config inference settings
        self.inference_size = 320

        # Optional configs
        # self.model.conf = 0.25  # NMS confidence threshold
        # self.model.iou = 0.45  # NMS IoU threshold
        # self.model.agnostic = False  # NMS class-agnostic
        # self.model.multi_label = False  # NMS multiple labels per box
        # self.model.classes = None  # (optional list) filter by class, i.e. = [0, 15, 16] for COCO persons, cats and dogs
        # self.model.max_det = 1000  # maximum number of detections per image
        # self.model.amp = False  # Automatic Mixed Precision (AMP) inference

    @bentoml.Runnable.method(batchable=True, batch_dim=0)
    def inference(self, input_imgs):
        # Return predictions only
        results = self.model(input_imgs, size=self.inference_size)
        return results.pandas().xyxy

    @bentoml.Runnable.method(batchable=True, batch_dim=0)
    def render(self, input_imgs):
        # Return images with boxes and labels
        return self.model(input_imgs, size=self.inference_size).render()


yolo_v5_runner = bentoml.Runner(Yolov5Runnable, max_batch_size=30)

svc = bentoml.Service("yolo_v5_demo", runners=[yolo_v5_runner])


@svc.api(input=Image(), output=PandasDataFrame())
async def invocation(input_img):
    batch_ret = await yolo_v5_runner.inference.async_run([input_img])
    return batch_ret[0]


@svc.api(input=Image(), output=Image())
async def render(input_img):
    batch_ret = await yolo_v5_runner.render.async_run([input_img])
    return batch_ret[0]
Here is a breakdown of the Python script:
Yolov5Runnable(bentoml.Runnable): Defines aYolov5Runnableclass that inherits from thebentoml.Runnableclass. The class attributesSUPPORTED_RESOURCESandSUPPORTS_CPU_MULTI_THREADINGare set to indicate that this Runnable class implementation can run on both CPU and GPU, and it supports multi-threading. If GPUs are available, they will be allocated based on the Resource Scheduling Strategy so that Runners can run on GPU resources.__init__(self): This method first loads the YOLO model and then checks if a GPU is available. If so, it moves the model to the GPU; otherwise, it leaves it on the CPU. It also specifies the inference size, namely the size of the image during the prediction or inference phase. There are several optional configurations commented out that you can uncomment and modify based on your specific needs.inferenceandrender: Instance methods of theYolov5Runnableclass. They are configured to be batchable, meaning that they can process multiple inputs at once.batch_dim=0specifies the dimension along which the inputs are batched. In most cases, the 0th dimension is used for batching.inferencedefines a method that runs the model on the input images and returns the predictions as a pandas DataFrame.renderdefines a method that returns images with detected objects highlighted with boxes and labels.bentoml.Runner()andbentoml.Service(): Create a Runner instanceyolo_v5_runnerwith a maximum batch size of 30 and wrap it in the Serviceyolo_v5_demo.APIs: Two asynchronous APIs,
invocationandrender, are defined for the Service. As mentioned above,invocationreturns a DataFrame of detected objects, whilerenderreturns images with detected objects highlighted.async_runis used to invoke the corresponding Runner methods asynchronously. This is beneficial for IO-bound tasks and can potentially improve the performance of the Service.
For more information about custom Runners, see Runners.
Run bentoml serve to start the Service.
$ bentoml serve service:svc

2023-08-02T12:00:53+0800 [INFO] [cli] Prometheus metrics for HTTP BentoServer from "service.py:svc" can be accessed at http://localhost:3000/metrics.
2023-08-02T12:00:54+0800 [INFO] [cli] Starting production HTTP BentoServer from "service.py:svc" listening on http://0.0.0.0:3000 (Press CTRL+C to quit)
The server is now active at http://0.0.0.0:3000. You can interact with it in different ways.
curl -X 'POST' \
   'http://0.0.0.0:3000/invocation' \
   -H 'accept: application/json' \
   -H 'Content-Type: image/png' \
   --data-binary '@image.jpg'
import requests

file_path = "/path/to/your/image.jpg"

with open(file_path, 'rb') as file:
      data = file.read()

headers = {
      "accept": "application/json",
      "Content-Type": "image/png",
}

response = requests.post(
      "http://0.0.0.0:3000/invocation",
      headers=headers,
      data=data,
)

print(response.text)
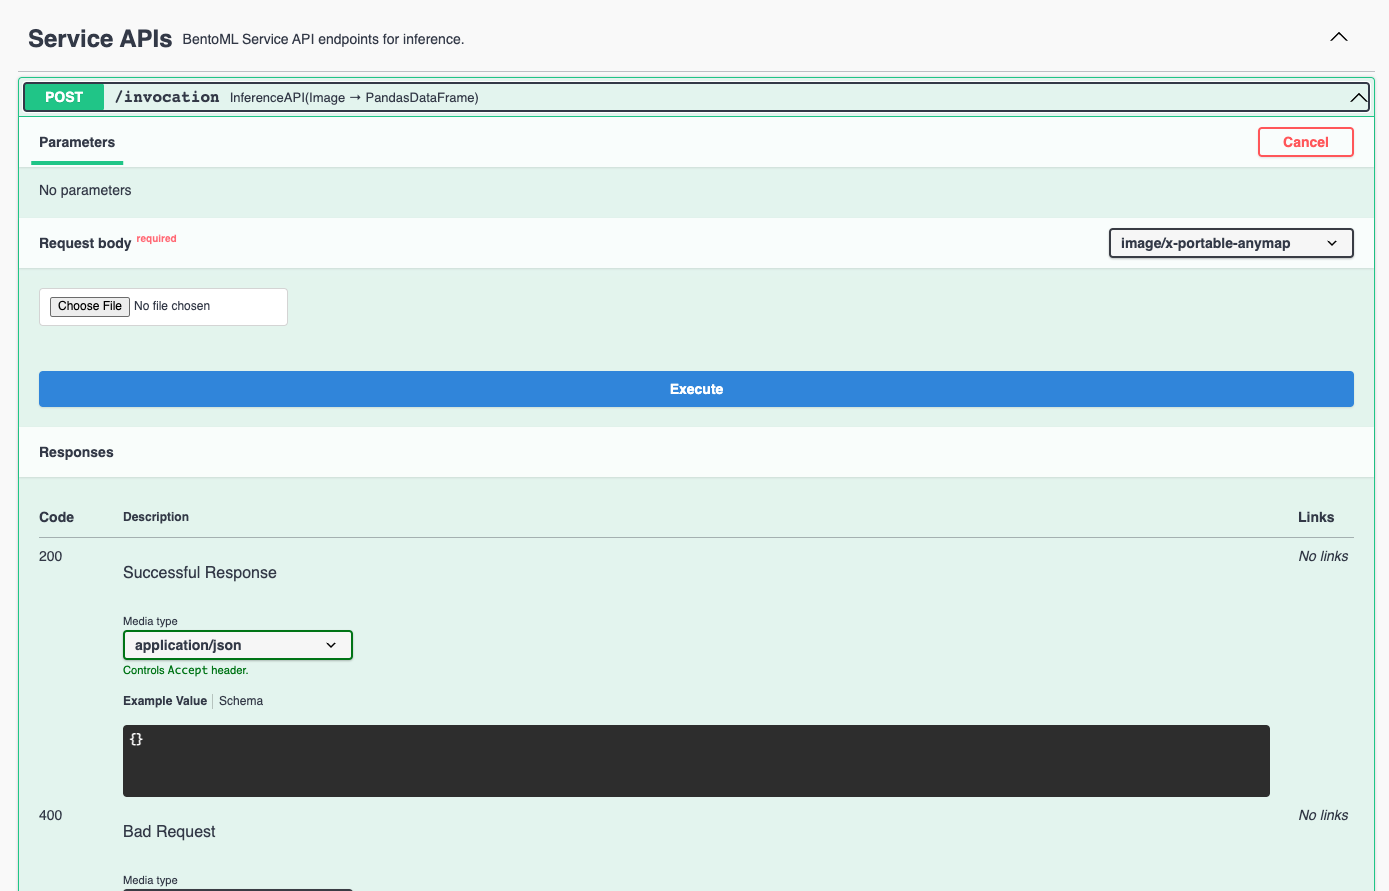
Visit http://0.0.0.0:3000, scroll down to Service APIs, choose an Inference API to interact (invocation or render),
and click Try it out. In the Request body section, click Choose File to provide an image and click Execute.
Example output for invocation:
{
  "xmin": 49.4790878296,
  "ymin": 400.3617553711,
  "xmax": 217.5674743652,
  "ymax": 888.9553833008,
  "confidence": 0.8962733746,
  "class": 0,
  "name": "person"
},
{
  "xmin": 27.3051528931,
  "ymin": 236.6776885986,
  "xmax": 804.9502563477,
  "ymax": 732.2774047852,
  "confidence": 0.8513903618,
  "class": 5,
  "name": "bus"
},
{
  "xmin": 222.8074188232,
  "ymin": 405.3190917969,
  "xmax": 340.5600280762,
  "ymax": 864.0921020508,
  "confidence": 0.7703214288,
  "class": 0,
  "name": "person"
},
{
  "xmin": 690.6552124023,
  "ymin": 477.9386291504,
  "xmax": 800.6559448242,
  "ymax": 866.6094360352,
  "confidence": 0.417524755,
  "class": 0,
  "name": "person"
}
Example output for render:
Build a Bento#
After the Service is ready, you can package it into a Bento by specifying a configuration YAML file (bentofile.yaml) that defines the build options. See Bento build options to learn more.
service: "service.py:svc"
include:
  - "service.py"
  - "yolov5s.pt"
python:
  requirements_txt: "./requirements.txt"
docker:
  system_packages:
    - ffmpeg
    - libsm6
    - libxext6
Run bentoml build in your project directory to build the Bento.
$ bentoml build

Using lowercased runnable class name 'yolov5runnable' for runner.

██████╗ ███████╗███╗   ██╗████████╗ ██████╗ ███╗   ███╗██╗
██╔══██╗██╔════╝████╗  ██║╚══██╔══╝██╔═══██╗████╗ ████║██║
██████╔╝█████╗  ██╔██╗ ██║   ██║   ██║   ██║██╔████╔██║██║
██╔══██╗██╔══╝  ██║╚██╗██║   ██║   ██║   ██║██║╚██╔╝██║██║
██████╔╝███████╗██║ ╚████║   ██║   ╚██████╔╝██║ ╚═╝ ██║███████╗
╚═════╝ ╚══════╝╚═╝  ╚═══╝   ╚═╝    ╚═════╝ ╚═╝     ╚═╝╚══════╝

Successfully built Bento(tag="yolo_v5_demo:hen2gzrrbckwgnry").

Possible next steps:

 * Containerize your Bento with `bentoml containerize`:
    $ bentoml containerize yolo_v5_demo:hen2gzrrbckwgnry  [or bentoml build --containerize]

 * Push to BentoCloud with `bentoml push`:
    $ bentoml push yolo_v5_demo:hen2gzrrbckwgnry [or bentoml build --push]
Deploy a Bento#
To containerize the Bento with Docker, run:
bentoml containerize yolo_v5_demo:hen2gzrrbckwgnry
You can then deploy the Docker image in different environments like Kubernetes. Alternatively, push the Bento to BentoCloud for distributed deployments of your model. For more information, see Deploy Bentos.